
- Beads
- Charms & Pendants
- Christmas
- DIY Kits
- Friendship Bracelet Supplies
- Halloween
- Jewellery Findings
- Tools & Supplies
- Sale Clearance Items
- Yogi Collection
Tree of Life – Lapis Lazuli Necklace
I love the symbolism of the tree of life – its roots (how they are earth bound), trunk (solid and strong) and branches (that represent growth and spread out and reach for the sky). This version incorporates a 40mm round Lapis Lazuli stone. I find Lapis Lazuli to be a very powerful gemstone it is said to to help wisdom, communication, peace, divine inspiration, inner truth and honesty.

MATERIALS
To make up just the tree of life pendant you will need
– 160cm of 24ga Parawire. Cut the wire into eight 20cm sections.
– One 51x49mm cast metal hoop. It is available in our online store here. You can make your own frame but I prefer when writing a tutorial to use one that is already made as it simplifies the process and makes the project more accessible for a beginner to intermediate beader.
– 10cm of 22ga Artistic Wire (to thread and secure the bead to the hoop)
– One 40mm flat round gemstone bead
METHOD
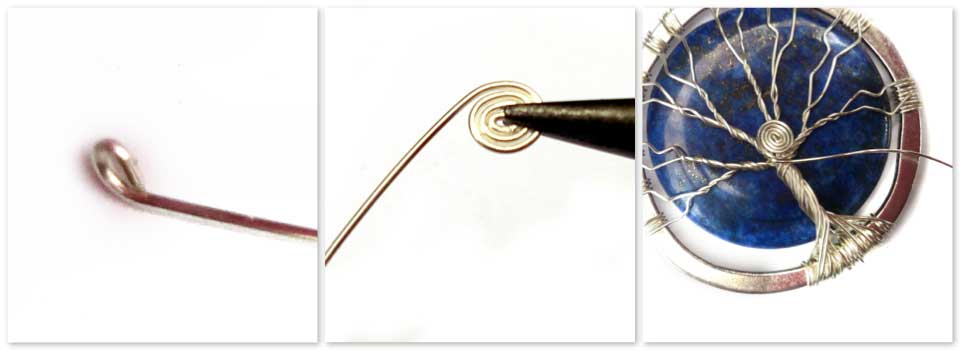
1. Take the 10cm length of 22ga wire. Secure the wire to the hoop by creating a 1.5cm tail and wrapping it around the hoop. Thread the bead on the wire and secure to the hoop by wrapping the end of the wire to the frame. Trim if need to finish the wire flushed.
2. Take one 20cm section of wire and fold it approximately half way making one section of wire 3cm longer than the other. Place the hoop so it sits in the fold. Now twist the longer section of wire around the hoop three times to secure the wire. Using the picture as a placement guide repeat this step to attach the other seven wire sections (place 4 sections on each side of the bead).
3. Create the trunk by bringing all the wire together in the centre and twisting for approx. 1cm. The end of the trunk should be sitting a little bit under half way. Now separate the wire sitting and spreading them out so the wire are grouped in their original eight groups of two.
4. Take right hand side’s bottom to groups of two (4 strands) and twist together for approx. 0.5-1cm*. Moving in an anti-clock wise direction take the next two groups of two and twist together. Keep doing this for the remaining two groups of two. *Vary the size for each group.
5. Re-spread the branches so they sit in their original groups of two wires. Now twist each group together for approx 0.5 to 1cm. Vary the size of the twist for each group. Re-spread the branches so they are now spread evenly and the the tree has good coverage. Once you are happy how your tree is looking sit the pendant in your hand flat and push the bead forward so the tree starts to mould around it. Secure the branches to the edge of the hoop by wrapping around the wire around hoop a few times before trimming and finishing flushed. Remember when you are finishing the tree to keep pushing the bead forward the tree if finished moulded around the bead.
6. Take your pliers and gently twist the wire of the branches randomly to give the branches of the tree more of a rustic look.
7. To create the centre swirl. Take 10cm of 22ga wire. Create a coil by gently folding over the tip then holding the wire in your pliers and working around. When the coil is the desired size place in the centre of the tree and secure by weaving the wire through the tree trunk and branches. Trim the tail and finish the end of the wire flushed and hidden.
I finished the pendant by taking one 8mm jump ring and threading a bead hanger. Then threading the finished pendant with a combination of synthetic cream howlite and Lapis Lazuli. I love the combination of the dark blue and cream its so sophisticated and fresh.

 Instagram
 TikTok
 Facebook
 Pinterest
 Youtube